Wednesday, March 18, 2009

Industry Day

Yesterday I after being let out of class early, we had the task of visiting Industry Day, in front of Squires. Heading there, I was not sure how interesting it would be. Visiting there turned out to be a pretty awesome experience. I got to learn about a bunch of pieces of construction equipment that I will be dealing with in the construction industry. Here are pictures and descriptions of some of the equipment from the day.


The machinery in the foreground of these two photos is of a flatbed truck, with a forklift mounted on the back of the bed. The Mack truck is a heavy duty truck that is used to transport materials, or other equipment form the supplier, to the jobsite. Then the forklift is used for easy offloading at the jobsite.

The machinery in the background of these two photos is a cement truck. This one is a new truck that costed about $160,000. The truck can hold 11 yards of concrete in the back. I never knew, but a cement truck is a complicated piece of equipment. The driver has to control the amount and temperature of the water in the drum, as well as numerous other aspects of the truck. It is not an easy job, where you just hop in and drive.


These two photos are of a track carrier, hydrolic drill. It is an intricate little machine that is used for drilling, and soil boring. This machine doesn't look like it would drive very fast, but it looks like it has a ton of power! It looks like it is powered by a diesel engine. I found out it costs a little over $150,000.


This is a picture of a telescopic truck-mounted crane, that was in front of the library at Industry day. The crane came from Keiwit, and it was used to lift and place a ceiling section on top of a wall section. After talking to the guy from Keiwit, I found out that the crane costs about $300,000 dollars. A lot of money; however, it is quite a large piece of equipment. It was kind of amazing watching the operator place the ceiling section with such precision.




Monday, March 2, 2009

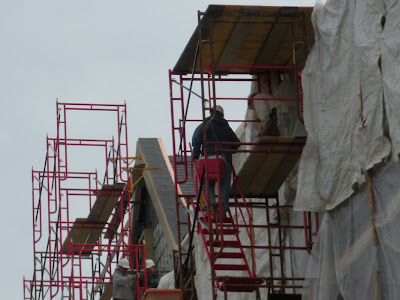
New Residence Hall


I visited the New Residence Hall that is being built on campus. Most of the work that was going on was the setting of the Hokie Stone on the exterior of the whole building. A lot of the work was being done behind the plastic and scaffolding, so much of it I was unable to see.


Sunday, March 1, 2009

Sketches

This is a sketch of the mock wall assembly on Perry Street. You can see both the Hokie Stone and concrete block. They are on opposite sides of the wall. The left side with the Hokie Stone would be the exterior of the building, and the right side with just the CMU blocks would be the interior of the wall. In between the Hokie Stone and Concrete block is multiple layers of vapor barriers and flashing.


These sketches above are wall sections through the door, and then the window, in my bedroom. The wall section through the door shows the steel door frame, which includes the door latch and hinges, the CMU blocks which makeup the wall, and the electrical box on the outside of my room. There are not many materials that makeup this drawing. The section through the window is about the same as the section through the door. It is made up of the wall heater inside of my room, the CMU block that makes up the wall, and the window unit. The only major the window section has is the Hokie Stone on the exterior.


The sketch above is a plan view of my bedroom. My bedroom is located in Barringer Hall on campus. The floor plan includes the entrance, a sink, the 2 closets, a window, and a heater. The materials used in this are CMU blocks for the wall, and wood for the closets.


The sketch above is the Landing detail of the landing between the 3rd and 4th floors. The landing is made up of the steel tread pans for the stairs, the steel channel bracket, a steel brace that supports the landing, another steel bracket against the wall, and the concrete that makes up the stairs and landing.

The sketch above is the stair tread detail. The tread pan is what the concrete is poured into in order to form the stairs. The stair treads are made out of steel, and the stairs themselves are made out of concrete.


The sketch above is the stairwell section. This is the stair section between the 3rd and 4th floor. This stair section show the stairs, the landings on either side of the stairs, the metal handrail, the makeup of the upper landing, and the fire sprinkler. The wall is made out of CMU blocks and the landins and stairs are concrete with steel treads.


The sketch above is a plan view of the stairwell between the 3rd and 4th floor in BFH. The arrows represent the direction of the stairs. The door is on the 4th floor landing. The landing and stairs are made of concrete.


The sketch above is one of the steel beam to the steel drip pan on the 3rd floor of BFH. The drip pan is to catch the water that drips from the HVAC system that is above it. There are a lot of parts and pieces connected to the unit. The parts and materials that I can see are the steel beam, the steel drip pan, numerous pipes and duct work, and technological parts coming off of the actual unit.


Tuesday, February 24, 2009

Excel Cost Estimating


This is an Assembly Cost estimate and a Unit Cost Estimate of the concrete take-off of the Research + Development Facility - Phase 2.

Wall Assembly


Materials used:
Exterior brick
Air/Vapor Barrier
Primer and Flashing
Gypsum Board
This is a wall assembly drawing for a typical exterior brick wall. The outer most layer of this wall assembly is a layer of regular exterior red brick. As you continue in, the next couple layers are numerous layers of air/vapor barriers, primers, and flashings. The next layer in is a sheet of gypsum board, followed by the insulation, then lastly another sheet of gypsum board.

Tuesday Feb 24, 2009 Attendance

Hey,
I'm in class today.

Thursday, January 29, 2009

1st Post

Funny YouTube video...